Table of Contents
ToggleYour master bedroom bathroom is one of the most-used rooms in your home, yet it’s often the last to get a proper refresh. Unlike a guest bath where you’re trying to impress, this space needs to work hard for your daily routine while still feeling like a retreat. Whether you’re planning a full renovation or targeting specific upgrades, the right combination of design, storage, and practical updates can transform a basic bathroom into a sanctuary. The good news? Many of these improvements don’t require a general contractor or a five-figure budget. Let’s walk through ideas that balance aesthetics, function, and real-world DIY feasibility.
Key Takeaways
- Master bedroom bathroom ideas range from minimalist design and spa features to smart storage, allowing you to create a personal retreat without a six-figure budget.
- Paint, hardware swaps, and lighting upgrades are budget-friendly updates that deliver maximum style impact in a weekend or less.
- Proper storage solutions like floating shelves, recessed medicine cabinets, and organizers keep surfaces clutter-free while maintaining a calm, intentional aesthetic.
- Lighting layers—task, ambient, and accent lighting with dimmable controls—transform a functional bathroom into an experience suited to morning routines or evening relaxation.
- DIY-friendly projects such as vanity painting, caulking, and shelving installation are achievable for confident homeowners, while professional help prevents costly mistakes on plumbing, electrical, and structural work.
- Natural elements like teak, stone, rainfall showerheads, and heated features elevate daily routines into spa-like experiences without requiring extensive renovation.
Modern Minimalist Design for Calm and Simplicity
A minimalist bathroom strips away visual noise and makes the space feel larger and more restful. The approach centers on clean lines, neutral palettes, and removing everything that doesn’t earn its spot.
Start with wall color: whites, soft grays, and warm beiges are classic for a reason. They reflect light and make small bathrooms feel airy. If you’re painting, use a semi-gloss or satin finish to handle humidity better than flat paint. Prep the walls by sanding glossy existing paint lightly, wiping dust with a tack cloth, and applying a quality primer suitable for bathrooms before your top coats.
Fixtures matter more than quantity. A single statement vanity, whether floating for a modern feel or a sleek pedestal sink, replaces the double-sink impulse buy. Wall-mounted faucets reduce clutter at the counter and make cleaning the vanity surface easier. Choose hardware in matte black, brushed nickel, or polished chrome: mixing metals is fine if intentional, but consistency reads cleaner.
Minimalism also means fewer, better-chosen accessories. One quality mirror, strategic shelving, and hidden storage keep surfaces clear. The goal isn’t cold, it’s intentional. Soft textures like a plush bath mat or a single piece of greenery add warmth without chaos.
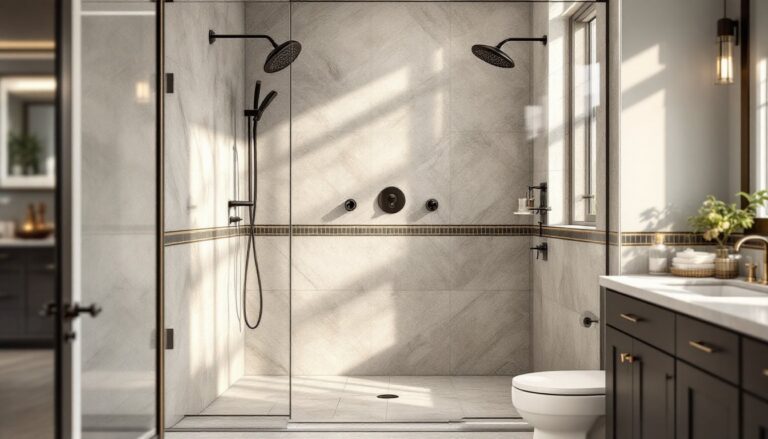
Luxury Spa Features That Elevate Everyday Routines
You don’t need a professional spa membership if your bathroom delivers the experience. Spa bathrooms focus on comfort, water features, and sensory details that feel indulgent.
Water features are the anchor. A rainfall showerhead, typically 8 to 12 inches in diameter, delivers a gentler, full-body spray than standard fixtures. These cost $30–$200 depending on finish and water-saving features. Installation is straightforward: turn off water, unscrew the old showerhead, wrap thread tape around the new fitting, and screw in place. If you want heated floors, radiant floor heating is a bigger project requiring mats or loops installed beneath tile before grouting, but it transforms a cold bathroom into a luxury feature. For renters or smaller budgets, heated bath mats and towel warmers ($40–$150) deliver coziness without renovation.
Lighting sets the mood. Dimmable lights let you adjust brightness, bright for morning routines, softer for evening baths. Install a dimmer switch in place of your existing switch (turn off power at the breaker, remove the old switch, connect the dimmer following the instructions, and secure). Frosted or sconce-style fixtures soften harsh shadows compared to bare bulbs.
Materials like natural stone or teak add warmth. A teak bath caddy or wooden shelf organizes bath products and looks intentional, not cluttered. Soaking tubs, especially freestanding models, are the ultimate spa splurge, but even upgrading your existing tub with jets can feel luxurious. Candles, a small speaker for music, and quality bath products complete the atmosphere.
Smart Storage Solutions for a Clutter-Free Space
A master bathroom fills quickly with toiletries, towels, and miscellaneous items. Smart storage keeps everything accessible without visual clutter.
Floating shelves are a DIY win. They’re installed using wall brackets and cleats, freeing floor space and creating an open, airy look. Find studs with a stud finder, drill holes, insert wall anchors if there’s no stud, and screw the bracket securely. Space shelves 15–18 inches apart for typical items. Floating vanities work the same way and provide a modern profile.
Recessed medicine cabinets use wall space efficiently and hide medications, razors, and first-aid supplies. Newer models have integrated lighting and soft-close doors, reducing slamming noise. Installation involves cutting a hole between studs (typically 16 inches apart), running wiring if adding lights, and securing the cabinet frame with nails or screws. If your studs aren’t perfectly spaced, a surface-mounted cabinet avoids the rough framing work.
Drawer organizers and pull-out bins maximize under-sink storage. Bamboo or plastic dividers keep drawer contents tidy, while tiered shelf risers double the surface area. Over-the-toilet shelving or wall-mounted corner shelves capture dead zones. The rule: assign each product a home so everything has a place and nothing gets lost behind bottles.
Linen closets benefit from higher shelving for seasonal items and lower hooks for damp towels to air-dry. A tension rod inside the cabinet hangs hand towels and saves drawer space. Keep daily items (toothbrushes, deodorant) in the most-reached zone and rotate stock seasonally.
Budget-Friendly Updates That Make a Big Impact
You don’t need to gut your bathroom to refresh it. Targeted updates deliver maximum style for minimal spend.
Paint is the easiest win. A fresh coat on walls, trim, or even cabinets costs $30–$100 in materials and takes a weekend. Bathroom-specific paint with mold-resistant primer prevents mildew stains and extends the life of your investment. Two coats are standard: allow proper drying time between coats to avoid peeling.
Hardware swaps are fast and cheap. Replace cabinet knobs, towel bars, and curtain rods with finishes that match your design direction, black, brass, or brushed nickel. A $5 knob install takes 30 seconds per door and transforms dated cabinets instantly.
Tile upgrades don’t mean full replacement. Add a subway tile accent wall or a patterned border strip. Peel-and-stick tiles are tempting but don’t hold up well in humid bathrooms long-term: proper thin-set mortar and grout last decades. If tiling seems daunting, start with a small area or hire it out, as grouting requires practice.
Lighting upgrades cost $40–$120 for fixtures and are a weekend project for anyone comfortable with basic wiring. Swapping a builder-grade vanity light for a modern sconce instantly improves the space. Recessed lights add brightness without taking up visual space.
Textiles set tone affordably. New towels in your color scheme, a quality bath mat, and a shower curtain update the look for under $50. Splurging on plush, absorbent towels feels luxurious daily.
Lighting and Color Choices for Mood and Ambiance
Lighting and color are the backbone of bathroom ambiance. Done well, they transform function into experience.
Lighting layers prevent harsh shadows. Task lighting, like vanity lights flanking the mirror, is essential for grooming. Ambient lighting (overhead recessed lights or a ceiling fixture) illuminates the whole space. Accent lighting (sconces, candles, or a backlit mirror) adds warmth and depth. Dimmability ties it all together, letting you adjust intensity for morning showers or evening soaks.
Color psychology matters in bathrooms. Blues and greens are calming and promote relaxation, ideal for a spa bath. Warm neutrals like taupe or soft gray feel grounding. If you love color, pick an accent wall or reserve bold hues for decor (towels, art) that’s easy to change. Avoid overly trendy colors if you’re not planning another refresh soon: pastels and trendy teals age quickly.
Mirror placement affects both light and perceived space. A large mirror opposite a window bounces natural light throughout the room and makes bathrooms feel bigger. If you’re replacing mirrors, consider a backlit mirror with integrated LED lighting for even illumination and a modern look. These cost $200–$600 installed but eliminate harsh shadows under eyes.
Tile and finishes influence the color story. Matte finishes feel modern and cozy: glossy tiles reflect light but can feel slippery when wet. Light tiles (white, cream, pale gray) open the space: darker tiles (charcoal, navy, forest green) add drama. Many successful bathrooms mix them: light walls, darker floor or accent tile. Balance visual weight intentionally.
DIY Projects You Can Complete This Season
Ready to roll up your sleeves? These projects are achievable for confident DIYers and deliver real transformation.
Vanity painting takes one weekend. Remove doors and hardware, sand lightly, prime, and apply two coats of bathroom-grade paint or cabinet-specific paint. Polyurethane topcoats protect against moisture. Reinstall hardware when fully cured (check paint instructions, typically 24–48 hours).
Shower surround updates might mean new tile, vinyl panels, or water-resistant beadboard. If retiling, remove old tile with a grout saw or oscillating multi-tool fitted with a grout blade. This is dusty, wear a dust mask and goggles. Clean the wall, apply cement backer board if the surface is soft, and lay new tile with thin-set mortar. Grouting requires a grout float and practice, so watch tutorials and do a test area first. Vinyl panels are faster: remove old caulk, clean, and stick panels to clean, dry walls. Less polished-looking, but effective for renters.
Caulking and regrouting refresh existing surfaces for $15 in materials. Remove old, cracked caulk with a caulk removal tool or oscillating saw, clean the joint thoroughly, and apply silicone caulk suitable for bathrooms. Smooth with a wet finger for a clean finish. Regrouting cracked grout lines takes a grout saw, replacement grout, and a grout float. It’s labor-intensive but cheaper than re-tiling.
Shelving installation is straightforward. Mount floating shelves using a level, stud finder, and lag bolts into studs. If studs don’t align with your desired shelf placement, use heavy-duty wall anchors rated for at least 25 pounds per anchor. Always verify weight limits and distribute load evenly.
Accessible bathroom features deserve mention. Installing grab bars isn’t cosmetic, they’re safety-critical and required by code in bathrooms serving elderly residents or those with mobility concerns. Mount bars into studs with lag screws rated for at least 250 pounds of pull force. Proper installation prevents catastrophic failure. A curbless shower or lowered threshold makes bathrooms age-friendly without looking institutional.
Conclusion
Your master bedroom bathroom doesn’t need a six-figure renovation to feel like a personal retreat. Start with one or two priorities, whether that’s modern minimalism, spa comfort, or smart storage, and build from there. Paint, hardware, and lighting offer quick wins: larger projects like tiling or flooring tackle harder problems. Be honest about what you can DIY safely versus where hiring professionals (plumbing, electrical, structural changes) saves time and prevents costly mistakes. The best bathroom is one that works for your life and makes mornings and evenings feel intentional rather than rushed.